» Home
  » Introduction
 

Creating a Webservice Part 1 of 2

by Dave, webmaster of 123aspx.com

 
With some help from the great guys from Secure Webs, I decided to expose my site, http://www.123aspx.com , as a web service. I wanted to start with something simple, so I decided to expose the "What's New" ASP.NET resources. The "what's new" section contains the latest 12 additions to my site. Here is a quick tutorial around writing that webservice.

Webservices in ASP.NET are built around the SOAP (Simple Object Access Protocol) and WSDL (Web Services Description Language). We're not going to get into these standards (WSDL, and SOAP), but instead, focus on creating a webservice and consuming it.


Planning

I decided to return a dataset object as my collection of new resources. I chose a dataset because most ASP.NET developers are already familiar with datasets, and they can easily be bound to datagrids. The dataset consists of 4 columns:
Name - the name or title of the resource.
URL - The url to the resource
Domain - The domain name the resource can be found at.
DateUpdated - The date the resource was updated

Layout

We start programming a webservice by declaring it to the .NET engine and importing the following namespaces:
     <%@ WebService Language="VB" Class="AspX123WebSvc" %>
    Option Strict On
    Option Explicit On
    Imports System
    Imports System.Data
    Imports System.Data.SqlClient
    Imports System.Web
    Imports System.Web.Services
    Imports Microsoft.VisualBasic
We also need to tell the compiler that the class "AspX123WebSvc" will be webservice enabled. We do this by inheriting the WebService namespace in the class declaration.
Public Class AspX123WebSvc : Inherits WebService
Now that we have our classes defined, I went ahead and declared the main function.

Getting To It
Because we are declaring a method here, we need to mark it as a webservice method using <webmethod()>
Public Function GetNewResources() As DataSet
I decided to add a friendly description to this method, to tell the consumer what this method does. When we view the default WSDL, supplied natively by ASP.NET, our description will show be available to the consuming programer. Once we have our functions and classes declared, writing a webservice is just like writing any other codebehind file.

Accessing the Database
Now that I have my webservice framework in place, let's go ahead and get our our data. In this example, I need to massage the data a little bit, specifically the domain name of the ASP.NET resource. So what I decided to do, was to return a datareader, strip off only the domain name of the resource (instead of returning the complete url), and then build the dataset that we will eventually be returning. To access the database I use 2 utility functions. One function is called GetDataReader( ) and the other function is called sqlConnString(). . GetDataReader() returns a SqlDataReader, it also takes advantage of System.Data.CommandBehavior.CloseConnection. System.Data.CommandBehavior.CloseConnection is a parameter that tells the framework to close the datareader as soon as I'm done reading from it. sqlConnString() is used to read my SQL Server connection string from the web.config file. I've included a snippet from my web.config file to display how I'm adding an appsettings section to web.config.
GetDataReader()
Private Function GetDataReader(sqlText as String) as SqlDataReader
    Dim dr as SqlDataReader
    Dim sqlConn as SqlConnection = new SqlConnection( sqlConnString() )
    Dim sqlCmd as SqlCommand = new SqlCommand( sqlText, sqlConn )
    
    sqlCmd.Connection.Open()
    dr = sqlCmd.ExecuteReader( System.Data.CommandBehavior.CloseConnection )

    Return dr
End Function

sqlConnString()
Private Function sqlConnString() as String
    Return System.Configuration.ConfigurationSettings.AppSettings("WebSvcDb")
End Function

web.config
<appSettings>
<add key="WebSvcDb" value="Password=;User ID=sa;Initial Catalog=pubs;Data Source=127.0.0.1;" />
</appSettings>

Getting the Data
I have a stored procedure called "s_res_whats_new". I execute the stored procedure to return the datareader.  I also create my dataset that I will be passing back to the webservice.

1,2,3 go configure – phase 2

Phase 2 Configuration – First Time

Now that setup is complete using IISLogsGUI to configure

Click Start, Program Files, IISLogs, IISLogsGUI.exe

A Dialog will appear asking for the Config file
Select IISLogsdEXE.exe.config file
Click Open

The EasyConfig GUI will appear

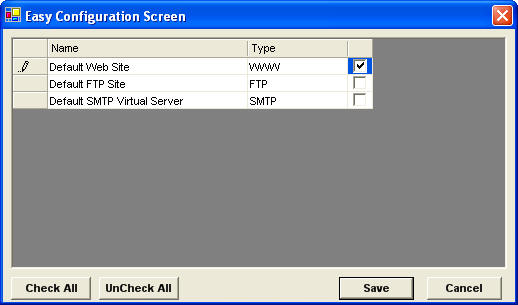
Click Select Individual Sites or Check All
Click Save

This will show the specific directories that will be monitored, if you want to add additional sites click Easy Config Button again

Else

Click Next

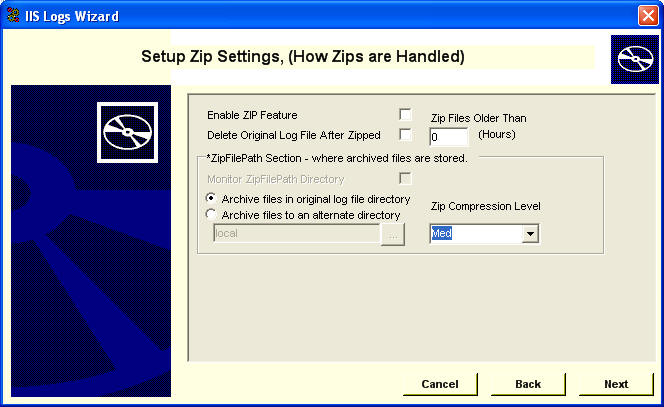
Select Enable ZIP Feature,
Optionally,
Select Delete Original Log File After Zipped,
Fill in ZIP Files Older Than (Hours) section, — Personally I use 168 (1 week).

If this is the first time configuring IISLogs to ZIP files, you’ll be prompted to agree to the
ZIP Feature Policy Agreement. 
This is an explicit agreement the person configuring
has tested IISLogs in a non-production environment or is in process of testing. Also 
verifying backups are available to insure critical Log Files are available, if needed. 

Notice the Delete Original File After Zipped, by default IISLogs doesn’t remove the original log file
and ONLY creates a zip file.  We strongly recommend you verify the zip files are able
to be extracted and/or recovered before enabling delete original file. 

Click Next

If you want to enable the one of the four delete options through out IISLOGS, you’ll be
prompted to agree to the Delete File Policy Agreement.   Enabling anyone of these
delete options for the first time will prompt you.  Once you’ve agreed, you’ll not be
prompted again.  For me, I enable the Enable Delete Feature first and have it delete files
older than 10 weeks old. 
this will vary depending on your policies.

Select Enable Delete Feature option, you’ll be prompted to agree to the
Delete File Policy Agreement.  Read, chose Accept and click OK.  You’ll not be prompted
again.

Select Enable Delete Feature,
Fill in Delete Retention Period (hours) — Personally I put 1688


Click Next

File Naming Options

If you take the defaults, the ZIP files will be named exYYDDMM.zip
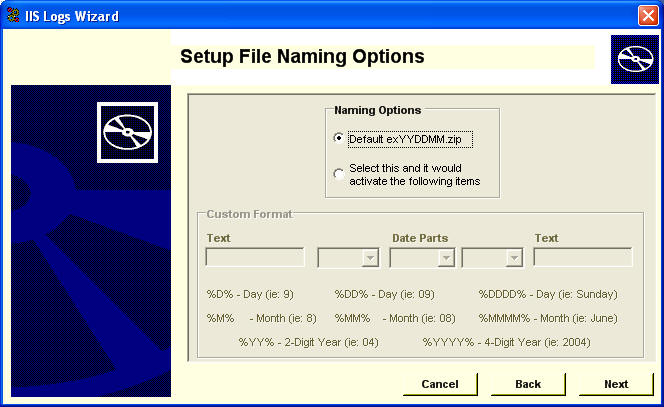
OR CUSTOM

The First and Last textbox is free-form text, these are optional and will add text either in front and/or back of the file name, spaces included.
Notice in dropdown textbox following items

%M% (Month in single digit),%MM% (Month in double digit),%MMMM% (In word format)
%D% (Day in single digit),%DD% (Day in double digit),%DDDD% (In word format)
%YY% (In two-digit year format), %YYYY% (In four year digit)

Select appropriate options
Click Next

This is a separate feature from IISLOGS, ONLY will DELETE files. This is feature to have the ability have some directories that  are configured to zip and delete and others to have the option to JUST delete after a separate configurable delete parameter, just put a comma deleted list of  directories to have their log files deleted separate from IISLogs core functionality I.E.(C:LogfileDir1,C:LogfileDir2,C:LogfileDir3) NO SPACES please.


Click Next

This feature ONLY will allow for monitoring the SMTP directories, normally under C:InetpubMailroot directory. This is a separate feature from IISLOGS and won’t ZIP files, files with extensions .BAD,.BDR,.BDP will ONLY be allowed to be deleted in the configured directories.

Select Mail Report, Note: the Mail User id and Mail Password fields are stored encrypted so they aren’t clear text in the config file.

Click Next

If your using the Stand-Alone EXE version, just skip over this section.

Select Next

ServiceInterval – This setting is ONLY used if your using the Windows Service version of IISLogs – 
This setting can be configured to allow IISLogs service component to run multiple times. The default is 3 AM,
if your going to add more than one time to run the IISLogs process, Here is an example of how to enter multiple
entries either using the IISLogs configuration GUI or favorite text editor. 
 

Click Next


Click Finished

IISLogsGUI configuration utility will appear, this will have all the settings configured in the Wizard. 
Review all settings.

To Launch IISLogsd Stand-Alone EXE
Select
Click the Wizard or select in Program Files. 

Optionally you can schedule IISLogsd.exe in using Windows Task Scheduler, a 3rd party scheduler to run on a timed basis.

OR

If your using Windows Service Version, open the Services applet in the control panel and start IISLogs Service

Enjoy,

Any questions, please email us at [email protected]

IISLogs Team.


Assembling the DataSet
Once I had a datareader back from my database, full of new resources, I loop through the datareader to create a dataset.  The reason I didn't bring back the dataset directly, is because I needed to modify some of the data, before I sent it out as the webservice, mainly the Date and Domain name. I modify the date, to have a short date format, and I modify the url to only return the domain name part of the url. For example, if I was referencing the resource /authors/Default.asp, I only want to return www.aspfree.com. Once I have the parameters URL, DateUpdated, Domain, and Resource Name, I add them to a datarow and add the datarow to a datatable, which is part of the dataset. Here is the code I use to loop through the datareader and compile the dataset.

REM -- get the data from the database
Dim sqlText as String = "exec s_res_whats_new"
Dim dbRead as SqlDataReader = GetDataReader( sqlText )

REM -- create the datatable
Dim ds as DataSet = New DataSet("NewResources")
Dim dt as DataTable = ds.Tables.Add("ResourceList")
Dim dr as DataRow

while dbRead.Read()
    DateUpdated = DateTime.Parse(dbRead.Item("res_dateupdated").ToString())
    ResourceName = dbRead.Item("res_name").ToString()
    ResourceUrl = dbRead.Item("res_url").ToString()
    ResourcePk = dbRead.item("res_pk").ToString()

    ResourceDomain = ""
    If len(ResourceUrl)>PROT_PRFX_LEN then
       REM -- Strip off 'http://' and remove everything after .com, .net, or .org, or less than 25 characters
        UrlWhatsNew = ResourceUrl & "/"
        ResourceDomain = LCASE(Left(Mid(UrlWhatsNew, PROT_PRFX_LEN ,Instr(PROT_PRFX_LEN,UrlWhatsNew,"/")-PROT_PRFX_LEN),MAX_DOMAIN_LEN)) 
    End if
    ResourceDate = DateUpdated.ToShortDateString() 
    ResourceUrl = "http://www.123aspx.com/resdetail.asp?rid=" & ResourcePk 

    REM -- Add to DataSet ds
    dr = dt.NewRow()
    dr("URL") = ResourceUrl
    dr("DateUpdated") = ResourceDate
    dr("Domain") = ResourceDomain
    dr("Name") = ResourceName

    dt.Rows.Add(dr)
End While

Here I manipulated the "res_dateupdated" field by first converting it to a date.  Because sql server is storing the date as a long date (mm/dd/yy with seconds),  I needed to parse the date to return only mm/dd/yy.  Creating a short date can be done by the following line:
            res_date = date_dateupdated.ToShortDateString()
I added each local variable to a column in a datarow, and then added the row to the dataset. After the datareader had finished looping, I returned the Dataset.

Testing
Now it was time to test my webservice.  ASP.NET provides a default page for testing webservices.  If you look closely, you will see the description:"Returns the latest 12 New and Updated Resources at http://www.123aspx.com" that we used to describe our method GetNewResources.Here is a screenshot.

ASP.NET returns a webservice in the form of the industry strandard, WSDL protocol. WSDL is an XML document that will tell the consumer what methods are available to be called, and can be considered a type of API. We can now test our webservice by clicking the Invoke button.  Here is a screen shot of the first 3 rows of data that will be sent to the consumer.

Conclusion
ASP.NET makes it extremely easy for us to build webservices. Once we have a basic understanding of how ASP.NET works, it isn't that hard to extend our knowledge to webservices. On to consuming the webservice...